Monday, February 16, 2015

Pottery Barn Locker Cabinet Knockoff

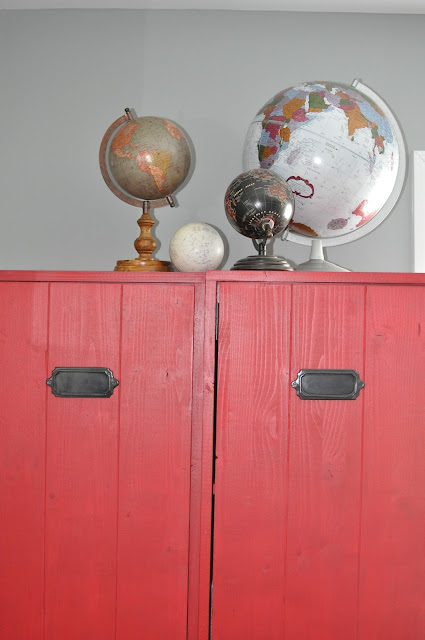
I love this pottery barn wood locker cabinet.

The online store has them in white, red and espresso color with different style doors.


I am trying to finish Aidan's bedroom and need a couple of those to store his books out of sight. I particularly like the red cabinet. It would add a nice touch of color to his gray walls and dark furniture.

After doing some research, I was able to sketch a design based on the plans I found on this website. This plan is for a double vintage wooden locker cabinet but I wanted two single cabinets so I made a few modifications.

I was so excited to get started that I forgot to document this furniture making process!
If you follow the instructions on the website and put your engineering mind and skills to the task, you will end up with a something like this....


My cabinets measurements:

The cabinets:
16 inches deep X 72.75 inches tall X 16.5 inches wide.
The doors:
14.75 wide X 69.75 tall
The Shelves:
15 inches X 15 inches

Tools Used:

- Circular saw (I find it easier to use than the table saw for trimming the door width)
- Miter saw  (for trimming small pieces)
- Router (for door grooves resembling paneling)
- Kreg Jig Pocket hole kit (for joining the top and bottom pieces to the side panels)
- Kreg Jig shelf hole kit
- Brad Nail Gun (for attaching the back panels and foot trim)

Supplies:
Instead of buying large plywood panels and cut them to size as the website suggests, I purchased:

- 6 wood furniture panels that measure 72x16 for all four sides and both doors. (photo here)
- 3 panels that measure 48x16 for the 2 tops, 2 bottom pieces and 5 shelves. I am missing a shelf in one of the cabinets though, So if you want 6 shelves (which makes more sense), then I suggest you purchase a longer panel. My local Lowes was out of them at the time and I was in a big hurry :-)
- 2 (1/4 inch thick x 2 x 2) wood pieces trimmed to 1.5 inches high X 16.5 wide to fit the front foot of the cabinet
- 4 (3/4 inch thick x 2 x 15) wood pieces to support the middle shelf for cabinet stability
- 1/4 inch thick paneling for the back
- 6 (3/4 inches) Hinges
- 2 Cabinet handles
- 4 Cabinet magnet latches for the tops and bottoms of each locker
- Paint or Stain
- Sand paper
- Kreg Jig Wood Screws
- Nails for Brad nail gun


I added the metal plaques. Those were a great find at $2 a piece from Pottery Barn.


Monday, February 9, 2015

The Vintage Canvas Look DIY

A gift to my brother in law, who loves to surf and paddle board


I have been wanting to experiment on canvas for a long time and after searching different posts on distressing, aging, chipping etc... all I could find was done on wood not canvas so I decided to try several different methods on a canvas square and see the results!

List of materials:
canvas
news paper
mod podge (or liquid glue and water mixture)
acrylic paint
a variety of brushes
powdered cinnamon
sand paper
sheet of paper for stenciling
exacto knife or silhouette cameo cutting tools for stenciling


What I did....


Start with an empty canvas. Mine is 12x12


Rip news paper sheets in pieces and mod podge them (or use a mixture of liquid glue and water) onto the canvas and its sides. Let dry.


Using a foam brush, paint the covered news paper canvas with acrylic white paint. Let dry.


Now, create your stencil! I used my silhouette cameo (but you can cut it by hand) and designed a 10 inch circle with the letters SUP (for Stand Up Paddle) in the middle. I had the machine cut it out of medium weight paper and I sprayed the back of the stencil with removable sticky spray (Krylon brand) and placed it on my painted canvas.


Choose a different color paint to contrast and brush it over the stencil. Be careful though! My news paper made wrinkles on the canvas and the paint sipped through. This will not be a perfect job and you will have to go back with a detailed brush to go over the letters to create straighter lines. I have a steady hand so I did not mind doing this step. It needs to look imperfect so it's no big deal if you can't get the straight lines.


After the paint has dried, sand the canvas to distress it. 


Make a "glaze" by adding water to brown acrylic paint (1 part paint for 3 parts water) and brush it all over the canvas. Wipe excess with a clean cloth or paper towel. This will give the white paint a dirty look and accentuate the wrinkles and holes even more!


To give your canvas a rusty look, all you need is a brush, mod podge (or liquid glue) and cinnamon powder.
With your detail brush, paint thin lines of glue on the canvas areas you want to look old and rusty and  cover them up with cinnamon. Let sit for a minute or so and shake off the excess.


With a foam or wide straight edge brush, apply mod podge all over the canvas (front and sides) to give your art work a protective layer. This process will give it a finished look.

I like the wrinkles, I like the dirty and rusty look and I love the contrast colors. 

Not bad for a first time experimenting on canvas!

Stephane has several interesting and fun websites he created and manages. If you love the ocean and water sports or simply like to bike on trails or around town, please check these out bellow.